


ENGLISH
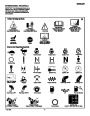
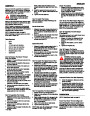
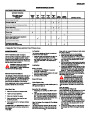
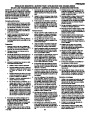
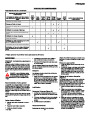
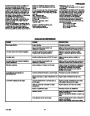
MAINTENANCE CHART
CUSTOMER RESPONSIBILITIES
SERVICE RECORDS
Fill in dates as you
complete regular
service.
Before
Each
Use
First
2
Hours
Every
5
Hours
Every
10
Hours
Every
25
Hours
Each
Season
Before
Storage
SERVICE DATES
Check Engine Oil Level
Change Engine Oil
√
√
√
√
√
√
Check And Tighten All Screws and Nuts
√
Check Spark Plug
Adjust Traction Drive Belt {
Check Fuel
√
√
√
{√
{√
√
Drain Fuel
√
Check Auger Clutch Cable Adjustment
(See Cable Adjustment)
√
√
Lubricate All Pivot Points
√
√
√
√
Lubricate Auger Shaft
(See Shear Bolt Replacement)
{
Adjust after First 10 hours and then Every 25 hours of use.
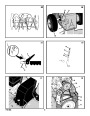
MAINTENANCE
As Required
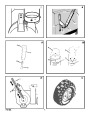
faces, such as a paved driveway or walk, adjust
the skids as follows.
The following adjustment should be preformed
more than once each season.
1.
2.
Put the snow thrower on a level surface.
Make sure both tires are equally inflated.
The correct air pressure is 14 PSI (1 BAR) to
17 PSI (1.25 BAR). Do not exceed the maxi-
mum amount of air pressure shown on the
side of the tire.
NOTE: Illustrations begin on page 3.
1.
Adjust the auger drive belt after the first 2 to
4 hours, again at mid-season, and twice
Use the following maintenance section to keep
your unit in good operating condition. All the
maintenance information for the engine is in the
engine manufacturer’s instructions. Before you
start the engine, read this book.
each season thereafter. See “How To Adjust
The Auger Drive Belt” in the Maintenance
section.
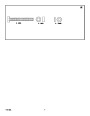
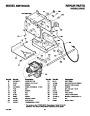
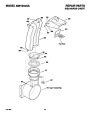
3. Put the extra shear bolts (found in the parts
bag) under each end of the scraper bar (15)
next to the adjustable skids (7).
WARNING: Before you make an in-
spection, adjustment (except
carburettor), or repair, disconnect
the wire from the spark plug.
Lubrication
4.
Loosen the mounting nuts (16) that hold the
adjustable skids (7). To bring the front of the
snow thrower down, raise each adjustable
skids (7) . Tighten the mounting nuts (16).
Every 10 Hours
1.
Lubricate the Zerk fittings (1) every ten
hours with a grease gun.
NOTE: For rocky or uneven surfaces, raise
the front of the snow thrower by moving the
adjustable skids (7) down.
2.
Each time a shear bolt is replaced, the auger
shaft must also be greased.
General Recommendations
The warranty on this snow thrower does not cov- 3. Lubricate all pivot points.
er items that have been subjected to operator
WARNING: Be certain to maintain
proper ground clearance for the
area to be cleared. Objects such
as gravel, rocks or other debris, if struck
by the impeller, can be thrown with suffi-
cient force to cause personal injury, prop-
erty damage or damage to the snow throw-
er.
abuse or negligence. To receive full value from
the warranty, the operator must maintain the
Every 25 Hours
snow thrower as instructed in this manual.
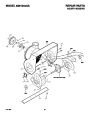
Chute Rotation Gear
Some adjustments must be made periodically to
properly maintain the snow thrower.
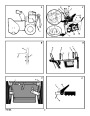
(Figure 7) Lubricate the chute rotation gear (1)
with automotive type oil.
How To Adjust
After Each Use
Items Not To Lubricate
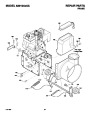
The Scraper Bar (Figure 2)
After considerable use, the scraper bar (15) will
become worn. The scraper bar (15), in con-
junction with the skids, must be adjusted to allow
1.
All bearings and bushings are lifetime lubri-
cated.
G
G
G
G
Check for any loose or damaged parts.
Tighten any loose fasteners.
2. The auger gear case is lubricated at the fac-
tory and does not require additional lubrica-
tion. If for some reason the lubricant leaks
out, have the auger gear case checked by a
factory authorized service center.
1/8
inch clearance between the scraper bar
Check and maintain the auger.
(15) and the sidewalk or area to be cleared.
1.
2.
Put the snow thrower on a level surface.
Make sure both tires are equally inflated.
The correct air pressure is 14 PSI (1 BAR) to
Check controls to make sure they are
functioning properly.
17
mum amount of air pressure shown on the
side of the tire.
PSI (1.25 BAR). Do not exceed the maxi-
G
If any parts are worn or damaged, replace
immediately.
How To Adjust The Height Of The Skids
(Figure 2)
All adjustments in the Maintenance section of
this manual should be checked at least once
each season.
This snow thrower is equipped with two height
adjustable skids (7). These skids elevate the
front of the snow thrower. For normal hard sur-
14
3. Loosen the carriage bolts and nuts that hold
the scraper bar (15) to the auger housing
(4).
F-031099L
| Categories | Murray Snow Blower Manuals, Snow Blower Manuals |
|---|---|
| Tags | Murray 629104X5A |
| Download File |
|
| Document File Type | |
| Copyright | Attribution Non-commercial |
(0 votes, average: 0 out of 5)