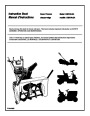


ENGLISH
9.
Adjust the traction drive belt guide(s) (9).
See “How To Adjust The Belt Guide” in the
Maintenance section.
Install and adjust the auger drive belt (4).
See “How To Remove The Auger Drive Belt”
in the Service And Adjustment section.
Adjust the auger belt guide (9). See “Auger
Belt Guide Adjustment” in the Service And
Adjustment section.
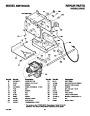
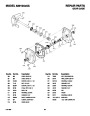
(Figure 20) Install the bottom panel (2).
Tighten the bolts (3) on each side of the bot-
tom panel (2).
(Figure 17) Install the belt cover (1). Tighten
screw (2).
6. (Figure 17) Install the belt cover (1). Tighten
screw (2).
9. Put the unit in a building that has good ven-
tilation.
7.
Connect the spark plug wire.
10.If the machine must be stored outdoors,
block up the snow thrower to be sure the en-
tire machine is off the ground.
10.
11.
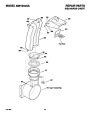
How To Replace the Auger Shear Bolt
11.
Cover the snow thrower with a suitable pro-
tective cover that does not retain moisture.
Do not use plastic.
The augers are secured to the auger shaft with
special shear bolts. These shear bolts are de-
signed to break and protect the machine if an
object becomes lodged in the auger housing.
Do not use a harder bolt as the protection pro-
vided by the shear bolt will be lost.
12.
13.
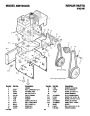
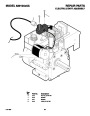
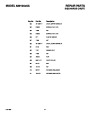
How To Order Replacement Parts
14.
15.
The replacement parts are shown either on the
back pages of this Instruction Book or in a
separate Parts List Book.
WARNING: For safety and to pro-
tect the machine, use only original
equipment shear bolts.
Check the adjustment of the cables. See
“How To Check And Adjust The Cables” in
the Maintenance section.
Use only manufacturer’s authorized or approved
replacement parts. The letter placed on the end
of the part number denotes the type of finish for
the part, C for chrome, Z for zinc, a PA for
purchased assembly. It is important that you
include this when ordering a part. Do not use
attachments or accessories not specifically
recommended for this unit. In order to obtain
proper replacement parts you must supply the
model number (see nameplate).
To replace a broken shear bolt, proceed as fol-
lows. Extra shear bolts were provided in the as-
sembly parts bag.
16.
Connect the spark plug wire.
NOTE: After approximately ten hours of op-
eration, a new belt will stretch and require an
adjustment of the belt tension. See “How To
Adjust The Traction Drive Belt” in the Service
And Adjustment section.
1.
(Figure 2) Move the throttle control (13) to
the stop position. Disengage all controls.
2. Disconnect the spark plug wire. Make sure
all moving parts have stopped.
How To Adjust The Auger Belt Guide
1.
2.
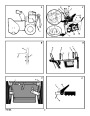
3. (Figure 13) Lubricate the auger shaft Zerk
fitting (1), if equipped, with a grease gun.
Disconnect spark plug wire.
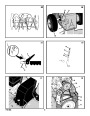
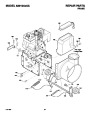
(Figure 17) Remove screw (2). Remove the
belt cover (1).
Replacement parts, except for the engine,
transmission, transaxle or differential, are
available from the store where the product was
purchased, a service shop recommended by the
store or from a “Murray, Inc. Central Parts
Distributor” listed on the back page of this
Instruction Book.
4.
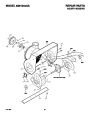
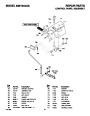
(Figure 23) Align the hole in the auger with
the hole in the auger shaft. Install the new
shear bolt (2), spacer (3) and locknut (4).
3.
4.
(Figure 2) Engage the auger drive lever (5).
(Figure 21) Measure the distance between
the belt guide (2) and auger drive belt (3).
The correct distance (4) is 1/8 inch (3.175
mm).
If an adjustment is necessary, loosen the
mounting bolt for the belt guide (2). Move
the belt guide (2) to the correct position
5.
Connect the spark plug wire.
How To Prepare The Snow Thrower For
Storage
If you are unable to obtain parts or service in the
manner outlined above, then contact:
USA - MURRAY, INC.
Outdoor Power Equipment
Customer Service Department
P.O. Box 268
5.
WARNING: Do not remove gasoline
while inside a building, near a fire,
or while you smoke. Gasoline
(4). Tighten the mounting bolt for the belt
guide (2).
(Figure 17) Install the belt cover (1). Tighten
screw (2).
fumes can cause an explosion or a fire.
Brentwood, Tennessee 37027
1-800-251-8007
6.
7.
1.
2.
3.
Drain the fuel tank.
Let the engine run until it is out of gasoline.
Connect the spark plug wire.
CANADA - MURRAY CANADA, INC.
Factory Customer Service
Drain the oil from the warm engine. Fill the
engine crankcase with new oil.
How To Adjust The Traction Drive Belt
Guides
1.
2.
3.
1195
Coutneypark Drive East
4. Remove the spark plug from the cylinder.
Pour one ounce of oil into the cylinder. Slow-
ly pull the recoil-start grip so that the oil will
protect the cylinder. Install a new spark plug
in the cylinder.
Mississauga, Ont. L5T-1R1
1-800-661-6662 Collect telephone calls will not
be accepted.
Disconnect spark plug wire.
(Figure 2) Engage the auger drive lever (5).
(Figure 17) Remove screw (2). Remove the
belt cover (1).
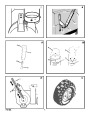
(Figure 22) Measure the distance (6) be-
tween belt guide (3) and traction drive belt
Replacement parts for the engine, transaxle, or
transmission, are available from the
manufacturer’s authorized service center found
5.
6.
Thoroughly clean the snow thrower.
4.
Lubricate all lubrication points. See the Main- in the yellow pages of the telephone directory.
tenance section.
Also, see the individual engine or transmission
warranties to order replacement parts.
(4).
If an adjustment is necessary, loosen
belt guide (3) and set the distance (6) for
belt guide (3) to 1,6 mm (1/16 inch).
Measure the distance (7) between belt
guide (8) and traction drive belt (4). If an
adjustment is necessary, loosen belt guide
7. Be sure that all nuts, bolts and screws are
securely fastened. Inspect all visible moving
parts for damage, breakage and wear. Re-
place if necessary.
When ordering the following information is
required:
(1) The Model Number
(2) Serial Number
(3) Part Number
(4) Quantity
5.
8. Cover the bare metal parts of the blower
housing, auger, and the impeller with spray
rust preventative lubricant.
(8)
(8)
and set the distance (7) for belt guide
to 4,8 mm (3/16 inch).
F-031099L
16
| Categories | Murray Snow Blower Manuals, Snow Blower Manuals |
|---|---|
| Tags | Murray 629104X5A |
| Download File |
|
| Document File Type | |
| Copyright | Attribution Non-commercial |
(0 votes, average: 0 out of 5)