


ENGLISH
4.
5.
6.
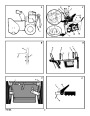
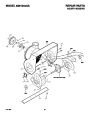
Adjust the scraper bar (15) to allow 1/8 inch
clearance between the scraper bar (15) and
the sidewalk or area to be cleared.
Tighten the carriage bolts and nuts. Make
sure that the scraper bar (15) is parallel with
the sidewalk or area to be cleared.
To extended the life of the scraper bar (15),
remove and reverse the mounting of the
scraper bar (15).
4. Tighten the nut (2).
ment belts available from your nearest autho-
rized service center.
Some steps require the assistance of a second
person.
5. (Figure 19) Depress the auger drive lever.
Check the tension on the auger drive belt
(4). In correct adjustment, the auger drive
belt (4) will deflect 1/2 inch (5) with moder-
ate pressure. If the adjustment is not correct,
repeat the adjustment.
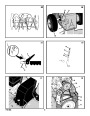
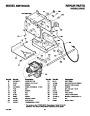
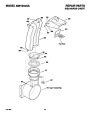
How To Remove the Auger Drive Belt
If the auger drive belt is damaged, the snow
thrower will not discharge snow. Replace the
damaged belt as follows.
6. (Figure 17) Install the belt cover (1). Tighten
screw (2).
7.
Check the adjustment of the auger drive
cable. See “How To Check And Adjust The
Cables” in the Maintenance section.
1. Disconnect the spark plug wire.
2. (Figure 20) Loosen the bolts (3) on each
side of the bottom panel (2).
How To Check And Adjust The Cables
The traction drive cable and the auger drive
cable are adjusted at the factory. During normal
use, a cable can become stretched and must be
checked and adjusted as follows.
3.
4.
Remove the bottom panel (2).
(Figure 17) Remove screw (2) from belt
cover (1). Remove the belt cover (1).
(Figure 18) Loosen the belt guide (9). Pull
the belt guide (9) away from the stack
pulley (10).
8.
Attach the spark plug wire.
How To Adjust The Traction Drive Belt
5.
6.
After approximately ten hours of operation, a
new belt will stretch and require an adjustment
of the belt tension. Also, if your snow thrower
experiences a loss of power under heavy load,
check the condition of the traction drive belt. If it
is damaged or loose, replace it (see “How To
Replace The Belts” in this section of the manu-
al).
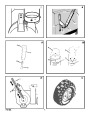
How To Check The Cables (Figure 15)
Pull the idler pulley (3) away from the au-
ger drive belt (4).
1.
2.
To check for correct adjustment, disconnect
the “Z” fitting (1) from the drive lever (2).
Move the drive lever (2) forward until the
drive lever (2) is contacting the plastic
bumper (3).
7. Remove the old auger drive belt (4) from
the stack pulley (10) and from the auger
drive pulley (11). Replace the auger drive
belt (4) with an original factory replacement
belt available from an authorized service
center.
3.
The control cable is correctly adjusted if the
center of the “Z” fitting (1) is aligned (4)
with the hole in the drive lever (2) and there
in no droop in the cable.
1. Disconnect the spark plug wire.
2. Unlock both left and right wheel locks. See
“How To Use The Wheel Lockout” in the Op-
eration section.
8.
Install the new auger drive belt (4) onto the
stack pulley (10) and onto auger drive
pulley (11).
3.
(Figure 17) Remove screw (2) from belt
cover (1). Remove the belt cover (1).
(Figure 18) Loosen the nut on the traction
idler pulley (12). Move the traction idler
pulley (12) 1/8 inch toward the traction
drive belt (13).
Tighten the nut (2).
(Figure 19) Depress the traction drive lever.
Check the tension on the traction drive belt
How To Adjust The Auger Drive Cable
9.
Adjust the auger drive belt (4). See “How To
Adjust The Auger Drive Belt” in the Mainte-
nance section.
1.
Remove the gas from the gas tank. Stand
the snow thrower up on the front end of the
auger housing.
4.
10.
11.
Adjust the auger belt guide (9). See “How
To Adjust The Belt Guide” in the Mainte-
nance section.
(Figure 17) Install the belt cover (1). Tighten
screw (2).
WARNING: Drain the gasoline out-
doors, away from fire or flame.
5.
6.
2.
3.
(Figure 15) Disconnect the “Z” fitting (1)
from the drive lever (2).
(Figure 16) Pull the spring cover up to ex-
pose the spring (5). Push the cable (6)
through the spring (5) to expose the square
end (7) on the cable (6).
12.Check the adjustment of the cables. See
“How To Check And Adjust The Cables” in
the Maintenance section.
(4). In correct adjustment, the traction drive
belt (4) will deflect 1/2 inch (5) with moder-
ate pressure. If the adjustment is not correct,
repeat the adjustment.
13.Connect the spark plug wire.
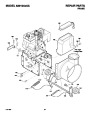
How To Remove the Traction Drive Belt
DO NOT over tighten belt. If the belt
is too tight, the drive will not disen-
gage. Before operating, check the
4.
Hold the square end (7) with pliers and ad-
just the locknut (8) in or out until the excess
slack is removed.
If the snow thrower will not move forward, check
the traction drive belt for wear or damage. If the
traction drive belt is worn or damaged, replace
the belt as follows.
belt tension following the instructions in
step 8.
5.
6.
Pull the cable (6) back through the spring
(5).
(Figure 15) Connect the “Z” fitting (1) to the
drive lever (2).
1.
2.
Disconnect the spark plug wire.
Remove the auger drive belt. See “How To
Remove The Auger Drive Belt” in the Mainte-
nance section.
7.
(Figure 17) Install the belt cover (1). Tighten
screw (2).
Attach the spark plug wire. Before operation,
check the belt tension as follows:
a. Unlock both left and right wheel locks.
See “How To Use The Wheel Lockouts” in
the Operation section.
b. Move the shift lever to NEUTRAL posi-
tion.
c. DO NOT engage the traction drive lever.
d. Start the engine.
e. Slowly move the shift lever forward.
Watch the axles for rotation. If the axles
rotate, the traction drive belt is too tight.
8.
NOTE: When the auger drive belt is adjusted
or replaced, check and adjust the cable.
3. Connect the spark plug wire.
4.
(Figure 18) Loosen the traction drive belt
guide(s) (15). Pull the traction drive belt
guide(s) (15) away from the traction drive
belt (13).
How To Adjust The Belts
The belts will stretch during normal use. If you
need to adjust the belts due to wear or stretch,
proceed as follows.
5.
Loosen the nut on the traction drive idler
pulley (12). Move the pulley (12) the maxi-
mum distance away from the traction drive
belt (13) and then tighten the nut on the
pulley (12).
How To Adjust The Auger Drive Belt
If the snow thrower will not discharge snow,
check the adjustment of the auger drive cable.
See “How To Check And Adjust The Cables” in
the Maintenance section. If the adjustment is
correct, then check the condition of the auger
drive belt. If the auger drive belt is damaged,
replace the auger drive belt. See “How To Re-
place The Belts” in the Maintenance section. If
the auger drive belt is loose, adjust as follows.
6. Remove the old traction drive belt (13) from
the smaller stack pulley (10). Then, remove
the stack pulley (10) and old traction drive
belt (13). Replace the traction drive belt
f.
If the belt is too tight, again adjust the
belt. After each adjustment, check the
belt tension before operating.
(13)
with an original factory replacement belt
9.
In correct adjustment, the snow thrower will
not experience a loss of power under heavy
load and the drive will automatically disen-
gage when the traction drive lever is re-
leased
available from an authorized service center.
7. Install the new traction drive belt (13) onto
the traction drive pulley (14) and onto the
engine shaft.
8. Install the stack pulley (10) onto the engine
shaft. Then, mount the traction drive belt
(13) onto the smaller stack pulley (10).
Tighten the stack pulley (10) securely to the
engine shaft.
1.
2.
Disconnect the spark plug wire.
(Figure 17) Remove screw (2) from belt
cover (1). Remove the belt cover (1).
How To Replace The Belts
3.
(Figure 18) Loosen the nut (2) on the idler
pulley (3) Move the idler pulley (3) 1/8 inch
toward the auger drive belt (4).
The drive belts are of special construction and
must be replaced with original factory replace-
15
F-031099L
| Categories | Murray Snow Blower Manuals, Snow Blower Manuals |
|---|---|
| Tags | Murray 629104X5A |
| Download File |
|
| Document File Type | |
| Copyright | Attribution Non-commercial |
(0 votes, average: 0 out of 5)